In this tutorial, I will teach you how to set up an online store through WooCommerce + WordPress that lists and sells physical products. Your e-commerce site should be something similar to this picture on the right at the end of this tutorial:
If you plan to sell more than 9 products, continue reading.
Use WordPress + WooCommerce for online store (FREE)
• In one sentence, WooCommerce is the best way to create a fully functional e-commerce store for your WordPress website. This is the specifics: WooCommerce is a WordPress plugin.
• Technically speaking, In order to function, it must be installed and activated like any other plugin.
• It’s open-source and free– like WordPress. You don’t need licenses, things don’t expire and nobody at any time asks for money.
• It’s the most popular WordPress e-commerce plugin out there.
• It is (presumably) also the most functional plugin of this kind. You can set it up yourself.
• The setup is quick. It’s usually a matter of a short period of time.
• It works with any design/theme you currently have on your WordPress site –you don’t have to change the design of your current site
WordPress & WooCommerce for the online store needs some plugins to go with them in order to make your business even better, easier, and more efficient. Here are something about our top picks:
An easy-to-use free plugin called WooCommerce Order Export allows you to export your WooCommerce orders and product data. Filters may be used to limit the data you’re searching for. In addition to the free version, there is a commercial version with many more features, such as exporting all essential data, automated exports to your email or FTP, columns reordering, multiple exports, and much more.
The video below illustrates some of the features:
Allows store managers to minimize shipping and create rule-based ways to determine the final shipment fee using the WooCommerce Table Rate Shipping plugin. In order to account for every component of the order, it is segregated into subcategories and given a particular price. It’s accessible for free as well as a premium version. Shipping rules (based on weight and more) may be used to construct fine-grained rules; you can also import or export your own shipping methods as well as import or export shipping rules from other services (such as FedEx and UPS).
If you’re intrigued by how that plugin works, take a look at the video below:
I could continue with the above list, but instead, just let me say that WooCommerce simply gives you everything you might ever need to build a high-quality WordPress e-commerce store.
What can you sell with WordPress + WooCommerce?
You can sell a large number of products:
• Physical products,
• Services,
• Digital products (e.g. ebooks, software, downloads)
• Subscriptions
• Bookings (e.g. Travel Tickets, appointments or anything else that can be booked),
• Other people’s products – as an affiliate,
• Customizations (e.g. Additional customizations in the listings of your product), and more.
In other words, with your website, you can make money.
I’d even risk saying that WooCommerce lets you sell anything that can be assigned a price tag. In addition, everyone can use it( if you have already launched a WordPress site, you can handle WooCommerce as well).
How to build a WordPress and WooCommerce online store
Note: The aim of this part of the guide is to show you the easiest way to build a functional WordPress e-commerce store so that you can get your store online as soon as possible. Therefore, I will concentrate only on the essential things and skip the more advanced aspects.
STEP 1. Get a domain name and web hosting
To create an online store or any other type of website, you will need two things:
Domain name is the unique web address of your store. Something like YOURSHOP.com
Web Hosting is essentially a remote computer that stores your website to anyone who wants to visit.
Full disclosure: I earn a commission each time you buy Bluehost. This helps me run website configuration as a business. Thank you for your help. There are hundreds of different hosting providers; I normally receive both from Bluehost.com. They offer affordable web hosting and reliability (including one year’s free domain name). They are also one of the few (official) hosting providers recommended by WordPress.org.
To start, you just have to go to Bluehost.com and click on the button “get started.”

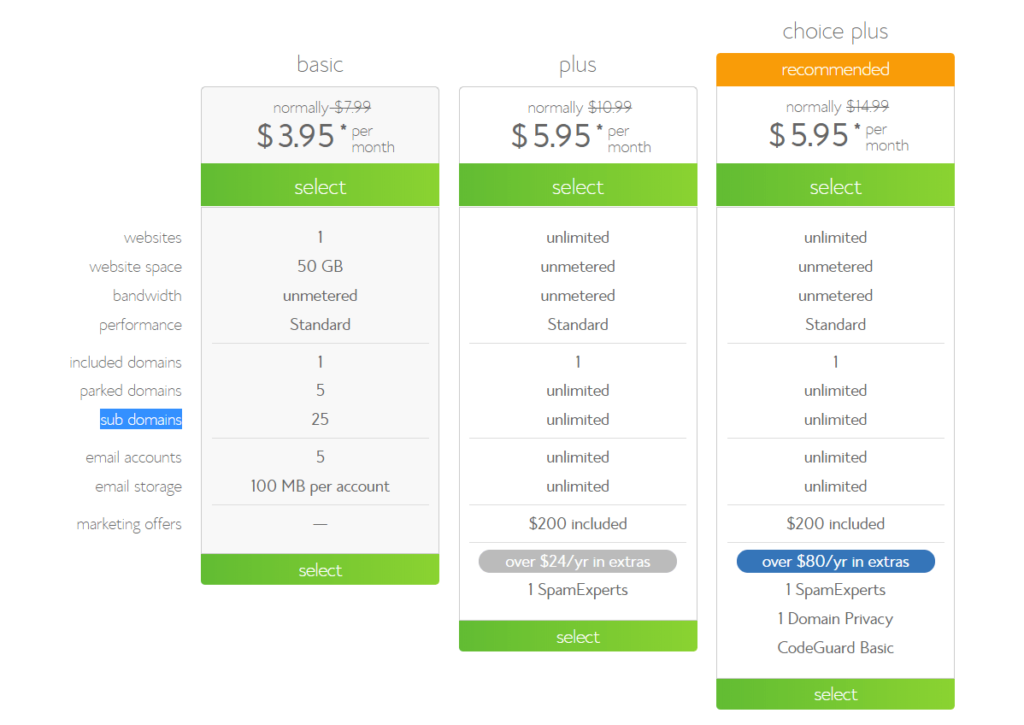
This takes you to a page where you can choose a hosting plan for your business. You can start with the cheapest option called “basic “:
The next step is to select a domain name for your new online business.
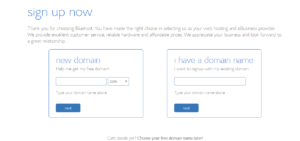
You need to brainstorm your domain name. Generally speaking, the domain name should be unique, easy to remember and catchy. To make brainstorming easy you can use a domain name generator called Domainglo or if you want to dig deep then you can hire a brand or domain name creator from Fiverr.
If you have already set up a business entity for your store, you might want to use it as your domain name. Once you have made your choice of domain, you can complete the setup and pay the initial hosting fee. Great! Great! You just got a domain name and a hosting plan for yourself.
STEP 2. Install WordPress (FREE)
The next step is officially the beginning of your WordPress adventure– you will install WordPress on your hosting account. This might sound hard, but actually, it’s not. All you need to do is go to your Bluehost user panel ( Bluehost sends you a link in the email confirmation) accessible usually at my.bluehost.com.
Scroll down until you see a ” WordPress Install” icon:
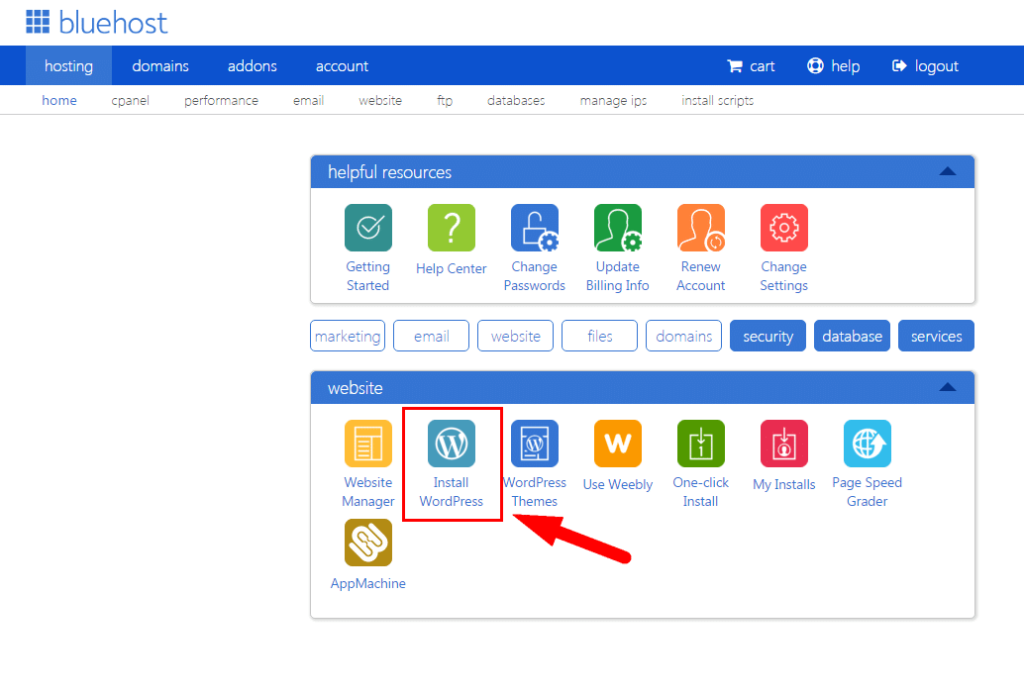
Click on it and follow the instructions on the screen. You’ll be taken step by step through the entire process, there’s nothing to worry about!
If you need more hands-on information about selecting a domain and installing a clean copy of WordPress, please follow this guide of How to Install WordPress on Bluehost (scroll to step 2).
You should have a blank WordPress website installed at this point.
You can see your main domain name( e.g. YOURSHOP.com).
You can connect to the admin panel via YOURSHOP.com / wp-admin.
Now it’s time to turn this blank WordPress website into a fully functional e-commerce store with a great WooCommerce plugin.
STEP 3. Install WooCommerce Plugin (FREE)
Like all WordPress plugins, the fun begins by browsing the WordPress Dashboard / Plugins / Add New. Type ” woocommerce” in the search field once there. You shall see WooCommerce as the first result of the search:
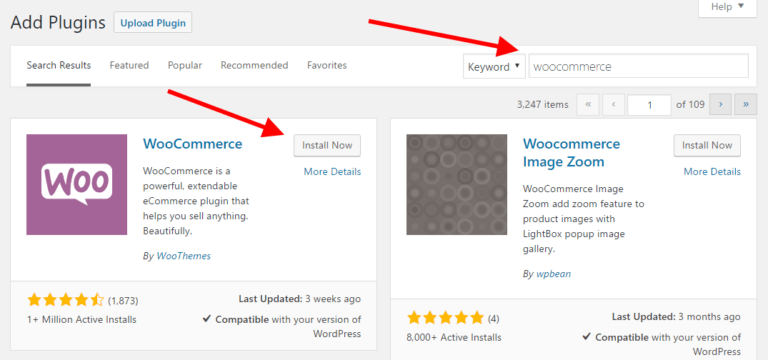
Just click the button ” Install Now” next to the plugin. After a few seconds, the button text changes to ” Activate.” Click on it.
At this stage, you’ll see the launch/setup wizard of WooCommerce on the screen. This facilitates the process and takes you through everything.
